The first injection molding machine was patented in the United States in 1872. Although significant, few advances followed until renewed interest emerged in Germany in the 1920s.
In the late 1930s, a significant advancement in injection molding emerged with the introduction of hydraulically operated machines. However, designers still largely adapted these machines as hybrids from die-casting technology. It wasn’t until the 1950s, with the development of a new generation of equipment, that injection molding machines specifically for plastics began to receive serious design attention.
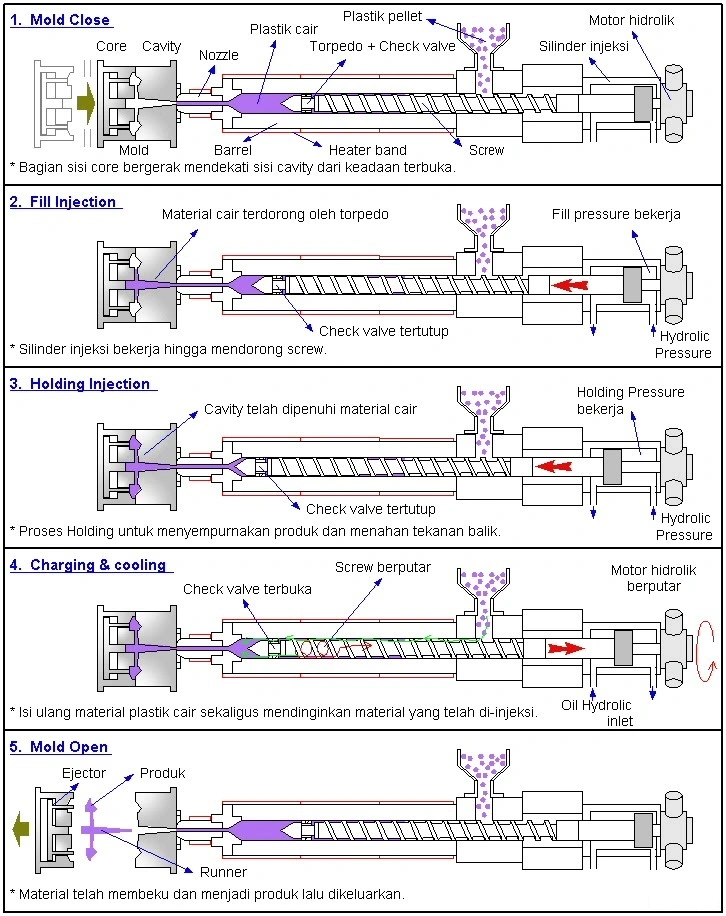
Today, injection molding is a straightforward process composed of four main stages: Filling, Holding, Cooling, and Demolding. These stages directly determine the quality of the molded product and form a continuous, integrated process.

1. Filling Stage
The filling is the first step in the injection molding cycle. The process begins when the mold closes and injection starts, ending when the mold cavity is approximately 95% filled. In theory, the shorter the filling time, the higher the molding efficiency. However, various conditions restrict the molding time or injection speed in practice.
- High-speed filling: During high-speed filling, the shear rate is high, causing the plastic’s viscosity to decrease due to shear thinning, which reduces overall flow resistance. Local viscous heating effects can also thin the solidified layer. Therefore, in the flow-controlled phase, filling behavior generally depends on the volume to be filled. In the case of thin walls with limited cooling effects, the benefits of a higher filling speed become more prominent.
- Low-speed filling: Under low-speed filling controlled by heat conduction, the shear rate is low, local viscosity is high, and flow resistance is significant. As the plastic replenishment rate is slower, the flow is gradual, and heat conduction effects become more apparent, with heat quickly dissipating into the cold mold wall. With minimal viscous heating, the solidified layer thickens, increasing flow resistance in thinner wall areas.
Due to fountain flow, the polymer chains in the advancing plastic align almost parallel to the flow front. When two molten flows converge, the contact area’s molecular chains remain aligned, leading to weaker structural strength in the weld line region. When observed under suitable lighting and angle, weld lines are visible, indicating areas prone to stress concentration and potential fracture.
Typically, weld lines formed in higher temperature zones exhibit better strength due to greater molecular chain mobility and higher mutual entanglement. Conversely, weld lines formed in low-temperature regions are weaker due to reduced chain mobility.
2. Holding Pressure Stage
The function of the holding pressure stage is to continuously apply pressure, compact the melt, and increase the plastic density (densification) to compensate for the shrinkage behavior of the plastic. During the holding pressure process, since the mold cavity is already filled with plastic, the back pressure is high. During the holding pressure compaction process, the screw of the injection molding machine can only move forward slowly, and the flow speed of the plastic is also slow. This flow is called holding pressure flow. During the holding pressure stage, the plastic is cooled and solidified by the mold wall, and the melt viscosity increases rapidly, resulting in high resistance in the mold cavity. In the later stage of holding pressure, the material density continues to increase, and the plastic part gradually forms. The holding pressure stage continues until the gate solidifies and seals, at which point the mold cavity pressure reaches its highest value.
During the holding pressure stage, due to the high pressure, the plastic exhibits partial compressibility. In high-pressure areas, the plastic is denser and has a higher density; in low-pressure areas, the plastic is looser and has a lower density, resulting in density distribution changes with position and time. During the holding pressure process, the plastic flow rate is extremely low, and flow no longer plays a dominant role; pressure is the main factor affecting the holding pressure process. During the holding pressure process, the plastic has already filled the mold cavity, and the gradually solidifying melt acts as a medium for transmitting pressure. The pressure in the mold cavity is transmitted to the mold wall surface through the plastic, tending to open the mold, so an appropriate clamping force is needed for mold clamping. Under normal conditions, the mold opening force will slightly open the mold, which helps with mold venting. However, if the mold opening force is too large, it can cause flash, overflow, or even open the mold. Therefore, when selecting an injection molding machine, an injection molding machine with sufficient clamping force should be chosen to prevent mold opening and effectively perform holding pressure.
3. Cooling Stage
Cooling system design is crucial in injection molding since the plastic product must cool and solidify to a certain rigidity to avoid deformation after demolding. Cooling takes up about 70-80% of the molding cycle time. A well-designed cooling system can significantly reduce cycle time, increase production efficiency, and lower costs. An improperly designed cooling system can lead to longer cycle times and higher costs, and uneven cooling can result in warping.
Experiments show that about 95% of the heat from the melt is dissipated into the mold, while only about 5% is radiated into the air. The cooling system uses cooling water channels to transfer heat away from the plastic in the cavity through thermal conduction to the mold, which is then dissipated into the coolant via thermal convection.
The cooling time accounts for the majority of the cycle, and it directly affects cycle length and production output. Before demolding, the part must be cooled below its heat distortion temperature to prevent residual stress relaxation or warping caused by demolding forces.
Factors affecting the cooling rate include:
- Product design: Wall thickness significantly affects cooling time. Generally, cooling time is proportional to the square of wall thickness.
- Mold materials and cooling methods: The thermal conductivity of mold materials affects cooling speed; higher conductivity leads to faster heat transfer and shorter cooling times.
- Cooling channel design: Closer, larger-diameter channels, and more channels improve cooling effectiveness and reduce cooling time.
- Coolant flow rate and properties: Higher flow rates improve cooling by facilitating convective heat transfer.
- Plastic selection: The thermal conductivity and specific heat of the plastic affect cooling rates. High thermal conductivity and low specific heat reduce cooling time.
- Processing parameters: Higher melt temperatures, mold temperatures, and ejection temperatures increase cooling time.
Cooling System Design Rules:
The cooling system should ensure even and efficient cooling. The design must consider product wall thickness and volume to determine parameters such as cooling channel position, size, length, configuration, and coolant flow rate.
4. Demolding Stage
Demolding is the final stage in the injection molding cycle. Although the part has solidified, demolding affects quality; improper methods can cause uneven stress and deformation. Two common demolding methods are ejector pins and stripper plates. The choice depends on the product’s structure to ensure quality.
For ejector pin demolding, the pins should be evenly distributed and positioned at points with maximum demolding resistance and greatest strength to prevent part deformation.
Stripper plates are often used for deep-cavity, thin-walled containers, and transparent products where ejector marks are undesirable. This method provides strong, uniform force with smooth motion, leaving no marks on the part.


